Wednesday, December 04, 2013

Docker for Hadoop... or how to build, init and run a Hadoop Cluster in minutes

It literally takes seconds to start a Docker container with pseudo-distributed Hadoop cluster. Most of the credits go, of course, to the docker script below and a bunch of configuration files... but let's not outmanoeuvre ourselves and start slowly :)

In short: Docker is a lightweight container that allows you to run your process(es) in a complete isolation from the rest of the system. Almost like a Virtual Machine but faster and lighter.

In this post we will review the Docker skeleton to build, init and run Hadoop (HDFS, Yarn, HBase, Pig) in a Pseudo-Distributed mode. Let's start with the project's filesystem tree structure:

├── etc
│   └── environment
├── hadoop
│   ├── core-site.xml
│   ├── hadoop-env.sh
│   ├── hadoop-metrics2.properties
│   ├── hadoop-metrics.properties
│   ├── hdfs-site.xml
│   ├── log4j.properties
│   ├── mapred-site.xml
│   ├── slaves
│   ├── ssl-client.xml.example
│   ├── ssl-server.xml.example
│   ├── yarn-env.sh
│   └── yarn-site.xml
├── hbase
│   ├── hadoop-metrics.properties
│   ├── hbase-env.sh
│   ├── hbase-policy.xml
│   ├── hbase-site.xml
│   ├── log4j.properties
│   └── regionservers
├── pig
│   ├── build.properties
│   ├── log4j.properties
│   └── pig.properties
├── root_scripts
│   ├── clear_hadoop_logs.sh
│   ├── hadoop_pseudo_start.sh
│   ├── hadoop_pseudo_stop.sh
│   ├── hdfs_format.sh
│   ├── hdfs_init.sh
│   └── set_env
├── zookeeper
│   ├── configuration.xsl
│   ├── log4j.properties
│   ├── zoo.cfg
│   └── zoo_sample.cfg
├── build.sh
├── Dockerfile
├── local_env.sh
└── run.sh

Here, we have three main categories:
  • Hadoop configuration files (found in hadoop, hbase, zookeeper, pig folders)
  • Docker scripts: Dockerfile, local_env.sh, build.sh and run.sh
  • Hadoop util scripts (found in etc, root_scripts directories and build.sh, run.sh scripts)
Hadoop configuration files and util scripts could be copied from my Github [1]. Tiny docker-helper scripts are as follows:
#!/bin/bash
sudo sh -c "wget -qO- https://get.docker.io/gpg | apt-key add -"
sudo sh -c "echo deb http://get.docker.io/ubuntu docker main\
> /etc/apt/sources.list.d/docker.list"
sudo apt-get update
sudo apt-get install lxc-docker
sudo mkdir -p --mode=777 /var/hstation/dfs
sudo mkdir -p --mode=777 /var/hstation/workspace
sudo mkdir -p --mode=777 /var/hstation/logs
view raw local_env.sh hosted with ❤ by GitHub
#!/bin/bash
sudo docker build -t bohdanm/cdh_4_5 .
view raw build.sh hosted with ❤ by GitHub
#!/bin/bash
sudo docker run -v /var/hstation/dfs:/dfs -v /var/hstation/workspace:/workspace -v /var/hstation/logs:/hlogs -h hstation.vanlab.com -i -t bohdanm/cdh_4_5 /bin/bash -l
view raw run.sh hosted with ❤ by GitHub

Now, with the foreplay complete, let's see the Dockerfile itself:

FROM ubuntu:precise
MAINTAINER Bohdan Mushkevych
# Installing Oracle JDK
RUN apt-get -y install python-software-properties ;\
add-apt-repository ppa:webupd8team/java ;\
apt-get update && apt-get -y upgrade ;\
echo oracle-java7-installer shared/accepted-oracle-license-v1-1 select true | /usr/bin/debconf-set-selections ;\
apt-get -y install oracle-java7-installer && apt-get clean ;\
update-alternatives --display java ;\
export JAVA_HOME=/usr/lib/jvm/java-7-oracle ;\
export HADOOP_LIBEXEC_DIR=/usr/lib/hadoop/libexec
# Cloudera CDH4 APT key and DPKG repositories
RUN apt-get -y install curl ;\
curl -s http://archive.cloudera.com/cdh4/ubuntu/precise/amd64/cdh/archive.key | apt-key add - ;\
echo "deb [arch=amd64] http://archive.cloudera.com/cdh4/ubuntu/precise/amd64/cdh precise-cdh4 contrib\ndeb-src http://archive.cloudera.com/cdh4/ubuntu/precise/amd64/cdh precise-cdh4 contrib" > /etc/apt/sources.list.d/cloudera.list
# Removing anything extra and installing pseudo distributed YARN-powered Hadoop
RUN apt-get remove hadoop-0.20-conf-pseudo hadoop-0.20-mapreduce-* ;\
apt-get update ; apt-get install -y hadoop-conf-pseudo
# Installing zookeeper
RUN apt-get install zookeeper-server ;\
# Installing HBase
RUN apt-get install -y hbase ;\
apt-get install -y hbase-master ;\
apt-get install -y hbase-regionserver
# Installing Pig
RUN apt-get install -y pig
# Install command-line utils
RUN apt-get install ping ;\
apt-get install -y vim.tiny
# Copy configuration files
ADD ./etc/ /etc/
ADD ./root_scripts/ /root/
# Init environment
RUN cat /root/set_env >> /etc/profile
RUN unlink /etc/hadoop/conf
ADD ./hadoop/ /etc/hadoop/conf/
RUN unlink /etc/hbase/conf
ADD ./hbase/ /etc/hbase/conf/
RUN unlink /etc/zookeeper/conf
ADD ./zookeeper/ /etc/zookeeper/conf/
# Replace placeholders with the actual settings
RUN sed -i 's/$HOST_ADDRESS/hstation.vanlab.com/g' /etc/hadoop/conf/*
RUN sed -i 's/$HOST_ADDRESS/hstation.vanlab.com/g' /etc/hbase/conf/*
RUN sed -i 's/$HOST_ADDRESS/hstation.vanlab.com/g' /etc/zookeeper/conf/*
RUN sed -i 's/$FS_MOUNT_POINT/\/dfs/g' /etc/hadoop/conf/*
RUN sed -i 's/$FS_MOUNT_POINT/\/dfs/g' /etc/hbase/conf/*
RUN sed -i 's/$FS_MOUNT_POINT/\/dfs/g' /etc/zookeeper/conf/*
# make scripts runnable
RUN chmod +x /root/*.sh
# add user <zookeeper> to group <hadoop>
RUN usermod -a -G hadoop zookeeper
# Expose Hadoop+Eco ports
# HDFS
EXPOSE 8020 50070 50075 50090
# HBase
EXPOSE 60000 60010 60020 60030 8080
# Yarn
EXPOSE 8030 8031 8032 8033 8040 8041 8042 8088 10020 19888
CMD ["/usr/local/bin/circusd", "/etc/circusd.ini"]
view raw Dockerfile hosted with ❤ by GitHub

This docker instance is based on Ubuntu 12.04 (Precise Pangolin) and covers all required components: Oracle JDK, Hadoop+Ecosystem, basic system utils. Installation instructions are as follows:
  1. Pre-configure local environment:
    $> ./local_env.sh
     
  2. Build the container (it will take a minute or two):
    $> ./build.sh
     
  3. Run the container:
    $> ./run.sh
  4. Once in the container - emulate login (and hence - reads env variables):
    #> su -
  5. HDFS Initialization (once only):
    #> ./hdfs_format.sh
    #> ./hadoop_pseudo_start.sh
    #> ./hdfs_init.sh
     
  6. Restart the cluster to finalize initialization:
    #> ./hadoop_pseudo_stop.sh
    #> ./clear_hadoop_logs.sh
    #> ./hadoop_pseudo_start.sh
  7. Enjoy your cluster:
    #> hdfs dfs -ls -R /
    #> hbase shell
            status 'simple'
    #> pig
By default, container's filesystem state is reset at each run. In other words - all your data is gone the moment you exit the container. Natural solution to this issue is move HDFS mount point and few other folders outside of the container:

Host OS FilesystemContainer FilesystemDescription
/var/hstation/dfs/dfsFolder hosts HDFS filesystem
/var/hstation/workspace/workspaceFolder to exchange data to/from container
/var/hstation/logs/logsContains Hadoop/HBase/Zookeeper/Pig logs

We are also exposing HTTP ports, that allow us to connect to the Hadoop processes inside the container:

Exposed Container PortsDescription
http://CONTAINER_IP:8088/clusterResource Manager
http://CONTAINER_IP:19888/jobhistoryJob History
http://CONTAINER_IP:50070HDFS Name Node
http://CONTAINER_IP:60010HBase Master
http://CONTAINER_IP:8042/nodeYarn Node Manager

In the table above, CONTAINER_IP is found by running following command in your container:
#> domainname -i


To sum things up, container build time will take about 10 minutes and another 2-3 minutes to start and init the container for the first time. From that moment on - it's literally seconds before your Hadoop sandbox is ready to crunch the data.

Cheers!

[1] https://github.com/mushkevych/configurations/tree/master/CDH4.pseudo-distributed

Tuesday, August 20, 2013

Puppet+Hiera+Jenkins. Jenkins Integration

Continuation. By now we should have a working bundle of Puppet and Hiera, and in this post we will focus on Jenkins integration, as well as management of the apps configuration.

First, let's recall that roles contain class {'configuration':} declaration. This tiny module allows us to keep a current copy of the apps configuration on the target nodes.
Module's file tree looks as follow:

.
├── files
│   ├── ci
│   │   ├── enterprise_app_1
│   │   │   ├── dir.1
│   │   │   │   └── file.1
│   │   │   ├── file.1
│   │   │   └── file.2
│   │   └── web_app_1
│   │   ├── dir.1
│   │   │   └── file.1
│   │   ├── file.1
│   │   └── file.2
│   └── qa
│   ├── enterprise_app_1
│   │   ├── dir.1
│   │   │   └── file.1
│   │   ├── file.1
│   │   └── file.2
│   └── web_app_1
│   ├── dir.1
│   │   └── file.1
│   ├── file.1
│   └── file.2
└── manifests
└── init.pp

The manifest file itself (init.pp) is as follows:
# file /biz/puppet/modules/configuration/manifests/init.pp
class configuration ($application, $env){
# creating directory structure first
file { ['/biz', '/biz/configuration']:
ensure => directory,
mode => 0640,
}
file { "/biz/configuration/${application}":
ensure => directory, # so make this a directory
recurse => true, # enable recursive directory management
purge => true, # purge all unmanaged junk
force => true, # also purge subdirs and links etc.
mode => 0640,
source => "puppet:///modules/configuration/${env}/${application}",
}
}
view raw configuration hosted with ❤ by GitHub


It can be summarized as procedure that base on ${environment} name and ${application} name copies configuration files from /biz/puppet/hieradata/${environment}/${application} on Puppet Master to /biz/configuration/${application} on Puppet Agent node.

It is important that destination point has no reference of the ${environment}. This later allows Jenkins to perform configuration update in a complete agnostic way - with only ${application} name being required.

Consider the file tree under files folder. It is grouped by environment and application name. Should you like to add a new application, let's say HelloWorld to the CI env, you would have to:
  1. Make sure that folder /biz/puppet/hieradata/ci exist
  2. Create new subfolder /biz/puppet/hieradata/ci/HelloWorld
  3. Place HelloWorld configuration files into /biz/puppet/hieradata/ci/HelloWorld 
  4. Create/update Jenkins script to take the application configuration files from /biz/configuration/${application}
  5. Create/update a role to reference the HelloWorld:

class role::hello_world_server inherits role {
# ...
class { 'configuration' :
env => "${environment}",
application => 'HelloWorld',
}
}

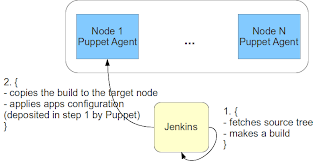
The flow can be illustrated as:
Fig 1: Deployment process

Last, but not least - let's describe development process on Puppet+Hiera+Jenkins govern cluster:

Fig 2: Development process
Fig 2 illustrates that the framework significantly fast-tracks configuration changes. In summary, we have shown a configuration management framework targeted for small-to-medium sized project, where you are comfortable with file-based configuration for your applications.

Cheers!

Puppet+Hiera+Jenkins. Custom Modules

Continuation. In this second post of the series we will focus on custom modules for the Puppet+Hiera+Jenkins framework. For the sake of brevity we will illustrate our efforts at an example of a single QA environment.

As it is defined in puppet.conf, site.pp file could be found at /biz/puppet/hieradata/${environment}. In terms of QA environment it is /biz/puppet/hieradata/qa:

node ip-10-0-8-11 {
include role::web_portal
}
node ip-10-0-8-12 {
include role::enterprise_server
}
view raw site.pp hosted with ❤ by GitHub

Here, manifest (aka site.pp) assigns a single role to every node in the cluster. Nodes are identified by the full domain name. Let's assume that:
  • Puppet Master lives at ip-10-0-8-10.sampup.com
  • ip-10-0-8-11.sampup.com and ip-10-0-8-12.sampup.com are Puppet Agents. 
Roles are defined in /biz/puppet/modules/role module:

# file /biz/puppet/modules/role/manifests/init.pp
class role {
include profile::base
}
# file /biz/puppet/modules/role/manifests/web_portal.pp
class role::web_portal inherits role {
include profile::web_server
class { 'configuration' :
env => "${environment}",
application => 'web_app_1',
}
}
# file /biz/puppet/modules/role/manifests/enterprise_server.pp
class role::enterprise_server inherits role {
# out of the blog post scope - install tomcat+java
# include profile::tomcat_server
class { 'configuration' :
env => "${environment}",
application => 'enterprise_app_1',
}
}
view raw roles hosted with ❤ by GitHub

You might be asking what class {'configuration':} is about? This where actual application configuration is delivered to agent nodes, and we will address this module in the last post of the series.

Corresponding profiles are defined in /biz/puppet/modules/profile module:

# file /biz/puppet/modules/profile/manifests/init.pp
class profile {
}
# file /biz/puppet/modules/profile/manifests/web_server.pp
class profile::web_server {
class { "apache": }
}
# file /biz/puppet/modules/profile/manifests/base.pp
class profile::base {
include networking
include timezone::utc
include users
}
view raw profiles hosted with ❤ by GitHub

Lets discuss Hiera configuration. There is a lot of reading available [1], however we can summarize following:
  1. Hiera data files are named after node's fully qualified domain name
    For instance: ip-10-0-8-12.sampup.com.json
  2. Files contain key-values pairs
    For instance: "ntp::restrict" : true
  3. Each key comprise of the module name and the property name, joined by ::
    For instance, in "ntp::restrict" : true - ntp is the module name
    - restrict is the property name
    - true is the value
  4. Declared key-values are applied during invocation of the parametrized Puppet classes
  5. In case Hiera finds no filename matching the node's domain name, it will first look in common.json
    Puppet will resolve to the default module parameters, should it find no relevant key-values pairs.
/biz/puppet/hieradata/qa/common.json

{
"ntp::restrict" : true,
"ntp::autoupdate" : true,
"ntp::enable" : true,
"ntp::servers" : [
"0.centos.pool.ntp.org iburst",
"1.centos.pool.ntp.org iburst",
"2.centos.pool.ntp.org iburst"
]
}
view raw common.json hosted with ❤ by GitHub

/biz/puppet/hieradata/qa/ip-10-0-8-12.sampup.com.json

{
"apache::vhost::priority": "10",
"apache::vhost::vhost_name": "web_server.sampup.com",
"apache::vhost::port": "80",
"apache::vhost::docroot": "/var/www",
}

Continue with Jenkins and application configuration.

[1] Hiera reading
http://docs.puppetlabs.com/hiera/1/puppet.html#hiera-lookup-functions

Puppet+Hiera+Jenkins. Concepts

Wouldn't it be great if we could transfer large part of the application configuration from Development to Ops? For instance, typical Java EE application hold tons of external references (such as DB Url, User, Password, Security Certificates, etc). Typical configuration change often requires hours and distracts developers, build engineers and QA. Lots of waste for trivial change.

In this series of three posts we will show a configuration management framework, build of Puppet, Hiera and Jenkins that supports multiple environments:
  • In this post we will review concepts and Puppet's configuration files
  • Second post will be devoted to custom modules and interaction with Hiera
  • Final, third post will focus on Jenkins integration
 Our target environment could be pictured as following:
Fig 1: Deployment schema for two environments

We will build on top of practices [1], and I strongly advice to read that article before proceeding further.

Conceptually, the workflow consist of the following steps:
1. Platform setup: during this step system interfaces and services of the nodes are configured (networking, file-system permissions, users and groups creations, rdbms, http servers, etc)
Fig 2: Puppet workflow


2.  Application setup: during this step business applications are installed and configured on the nodes
Fig 3: Jenkins workflow

Our skeleton's file structure will look as follow:
.
├── biz
│ └── puppet
│ ├── hieradata
│ │ ├── ci
│ │ │ ├── node
│ │ │ │ ├── ip-10-0-8-11.sampup.com.json
│ │ │ │ └── ip-10-0-8-12.sampup.com.json
│ │ │ ├── common.json
│ │ │ └── site.pp
│ │ └── qa
│ │ ├── node
│ │ │ ├── ip-10-0-8-11.sampup.com.json
│ │ │ └── ip-10-0-8-12.sampup.com.json
│ │ ├── common.json
│ │ └── site.pp
│ └── modules
│ ├── configuration
│ │ ├── files
│ │ │ ├── ci
│ │ │ │ ├── enterprise_app_1
│ │ │ │ │ ├── dir.1
│ │ │ │ │ │ └── file.1
│ │ │ │ │ ├── file.1
│ │ │ │ │ └── file.2
│ │ │ │ └── web_app_1
│ │ │ │ ├── dir.1
│ │ │ │ │ └── file.1
│ │ │ │ ├── file.1
│ │ │ │ └── file.2
│ │ │ └── qa
│ │ │ ├── enterprise_app_1
│ │ │ │ ├── dir.1
│ │ │ │ │ └── file.1
│ │ │ │ ├── file.1
│ │ │ │ └── file.2
│ │ │ └── web_app_1
│ │ │ ├── dir.1
│ │ │ │ └── file.1
│ │ │ ├── file.1
│ │ │ └── file.2
│ │ └── manifests
│ │ └── init.pp
│ ├── networking
│ │ └── manifests
│ │ └── init.pp
│ ├── profile
│ │ └── manifests
│ │ ├── base.pp
│ │ ├── init.pp
│ │ └── web_server.pp
│ ├── role
│ │ └── manifests
│ │ ├── enterprise_server.pp
│ │ ├── init.pp
│ │ └── web_portal.pp
│ └── timezone
│ └── manifests
│ ├── init.pp
│ └── utc.pp
├── etc
│ └── puppet
│ ├── hiera.yaml
│ └── puppet.conf
├── agent_deploy.sh
├── deploy.sh
└── install_modules.sh
view raw file_tree.txt hosted with ❤ by GitHub


Three folders form a top-level hierarchy:
  • /etc/puppet soon after puppet package is installed this folder contains standard puppet modules
    In addition, we will place there two configuration files:
    - puppet.conf describing puppet search paths and config
    - hiera.yaml describing Hiera search paths and config
  • /biz/puppet/modules contains all of the custom modules
  • /biz/puppet/hieradata holds Hiera data files grouped by environment
Lets review puppet configuration files from /etc/puppet

puppet.conf
[main]
server = ip-10-0-8-10.sampup.com
certname = ip-10-0-8-10.sampup.com
#user = puppet
#group = puppet
vardir = /var/lib/puppet
factpath = $vardir/lib/facter
templatedir = $confdir/templates
# The Puppet log directory.
# The default value is '$vardir/log'.
logdir = /var/log/puppet
# Where Puppet PID files are kept.
# The default value is '$vardir/run'.
rundir = /var/run/puppet
# Where SSL certificates are kept.
# The default value is '$confdir/ssl'.
ssldir = $vardir/ssl
[master]
dns_alt_names = ip-10-0-8-10.sampup.com, puppet
# overriding location of the hierra.yaml
hiera_config = /etc/puppet/hiera.yaml
# site.pp path
manifest = /biz/puppet/hieradata/$environment/site.pp
# a multi-directory modulepath:
modulepath = /etc/puppet/modules:/usr/share/puppet/modules:/biz/puppet/modules
[agent]
pluginsync = true
# The file in which puppetd stores a list of the classes
# associated with the retrieved configuratiion. Can be loaded in
# the separate ``puppet`` executable using the ``--loadclasses``
# option.
# The default value is '$confdir/classes.txt'.
classfile = $vardir/classes.txt
# Where puppetd caches the local configuration. An
# extension indicating the cache format is added automatically.
# The default value is '$confdir/localconfig'.
localconfig = $vardir/localconfig
certname = ip-10-0-8-11.sampup.com
dns_alt_names = ip-10-0-8-11.sampup.com
report = true
archive_files = true
environment = qa
view raw puppet.conf hosted with ❤ by GitHub

This file should be normally divided into two: one with [main] and [master] sections deployed at Puppet Master node and another with [main] and [agent] sections deployed to Puppet Agent nodes.
puppet.conf provides wide spectrum of settings [3], but here we define only most critical ones, such as:
  • modulepath defines path to the custom modules
  • manifest defines where site.pp files are located
    Note that in our case site.pp files are environment-specific. For instance site.pp for QA environment is stored in /biz/puppet/hieradata/qa/ folder
  • server identifies the Puppet Master domain name
  • environment defines environment of the Agent node. For instance: qa, ci, etc
    Details on the environment setting could be found at [2]

hiera.yaml
---
:backends:
- json
:json:
:datadir: /biz/puppet/hieradata/%{::environment}
:hierarchy:
# A single node/ directory will contain any number of files named after some node’s fqdn (fully qualified domain name) fact.
# (E.g. /etc/puppet/hiera/node/grover.example.com.json) This lets us specifically configure any given node with Hiera.
# Not every node needs to have a file in node/ — if it’s not there, Hiera will just move onto the next hierarchy level.
- node/%{::fqdn}
- common
:logger:
- puppet
view raw hiera.yaml hosted with ❤ by GitHub
Above, we declared that configuration files for particular nodes in the cluster will be in JSON format, grouped by environment and identified by the full domain name.
Note that the attribute -common under :hierarchy: denotes common settings for the environment and in our case refers to the /biz/puppet/hieradata/${environment}/common.json file.

Continue with custom modules.

[1] Craig Dunn: Designing Puppet – Roles and Profiles
http://www.craigdunn.org/2012/05/239/

[2] Defining environment in Puppet/Hiera
http://docs.puppetlabs.com/guides/environment.html

[3] Puppet.conf in details
http://docs.puppetlabs.com/references/latest/configuration.html

Friday, July 26, 2013

OrderedSet for Python 2.7

While working on the Kosaraju algorithm for Coursera course [1] homework, I wrote a simple and (hopefully) convenient OrderedSet for Python 2.7

Feel free to use and share it:

from collections import OrderedDict
class OrderedSet(OrderedDict):
def pop(self):
""" Returns and removes last element of the set """
if not self:
raise KeyError('dictionary is empty')
key = next(reversed(self))
del self[key]
return key
def peek(self):
""" Returns last element of the set without removing it """
if not self:
raise KeyError('dictionary is empty')
key = next(reversed(self))
return key
def at(self, i):
""" Returns element at the index """
if not self:
raise KeyError('dictionary is empty')
return list(self)[i]
def extend(self, iterable):
""" Extends OrderedList by appending elements from the iterable """
for element in iterable:
if element not in self:
self[element] = True
def append(self, element):
""" Appends an element to the end of the ordered set """
if element not in self:
self[element] = True
view raw ordered_set.py hosted with ❤ by GitHub
And just in case you are looking for unit tests or simple usage examples, please refer to the gist below:
def test_ordered_set_a():
o_s = OrderedSet()
SIZE = 100
for i in range(SIZE):
o_s.append(i)
for i in range(SIZE * 2):
assert o_s.peek() == SIZE - 1
for i in range(SIZE):
assert o_s.pop() == SIZE - 1 - i
assert len(o_s) == 0
just_a_list = [i for i in range(SIZE)]
o_s.extend(just_a_list)
for i in range(SIZE):
assert o_s.at(i) == i
o_s.extend(just_a_list)
assert len(o_s) == SIZE
for i in range(SIZE):
assert o_s.at(i) == i
just_a_list = [i for i in range(SIZE / 2, SIZE * 2)]
o_s.extend(just_a_list)
assert len(o_s) == SIZE * 2
for i in range(SIZE * 2):
assert o_s.at(i) == i

Cheers!

[1] Algorithms: Design and Analysis, Part 1
https://class.coursera.org/algo-004/class/index

Saturday, May 18, 2013

launch.py

Good news is - you don't have to write any extra code to run your Python application in a separate process (so called daemonization). All you need is - fully specified name of the method/function to execute. Something like:

    some_package.some_class.SomeClass.start_me
or
    some_package.some_script.main_function

Everything else is handled by launch.py [1].

launch.py is a set of friendly Python tools to install Virtual Environment, start, stop your application. In addition it gives you a single interface to test and analyze your code; provides configuration management.

In this post we will outline two features: installation and daemonization.

Installation. It's simple. launch.py will create a Virtual Environment for you and make sure that your application is executed within it. What you need to do is to download all of the required libraries for your application and place them in folder:
    launch.py/vendor 

Order of the libraries installation is defined by script:
    launch.py/scripts/install_virtualenv.sh


Once this step is complete just run ./launch.py -i to install Virtual Environment along with all of required libraries.

launch.py is also there to help with the application start and stop. There are two modes to run your application:
  • daemonized
    the application is started in a separate process
  • interactive
    the application is executed in the same command-line terminal where you have called launch.py and uses shared stdin, stdout and stderr to interact with the user
To use this feature simply follow the guide:
  1. Write the actual code
    List of the following assumptions is in place:
    - starter method or function has signature starter_name(*args)- classes implement __init__(self, process_name)
  2. Register your fully specified function/method name in launch.py/system/process_context.py as follows:
    PROCESS_CONTEXT = {
    ...
        'YOUR_PROCESS_NAME': _create_context_entry(
            process_name='YOUR_PROCESS_NAME',
            classname='workers.some_script.main',
            token='YOUR_PROCESS_NAME',
            time_qualifier=''),
    ...
    

    Should you wish to instantiate a class instance and start its method - simply define the class name:

            classname='workers.some_module.YourPythonClass.starter_name'
    

  3. ./launch.py --run --app YOUR_PROCESS_NAME will start your class' or script's starter method/function in a separate process (daemonized mode) 
  4. Add --interactive to the command above and run it in an interactive mode
In summary - launch.py is here to make your life easier. You can find details and read on many other features of the launch.py framework at its wiki [2].

Cheers!

[1] launch.py on the Github
https://github.com/mushkevych/launch.py

[2] launch.py WIKI
https://github.com/mushkevych/launch.py/wiki

Friday, March 08, 2013

PMP Audit and Exam

If you are like me, then after 4 months of studying PMP Exam Prep in transit, you registered at pmi.org and applied for the PMP exam. And (if you are like me) you have seen the sacred "your application has been chosen for the audit". Feel free to be like me and give yourself 20 minutes to panic: I recall running into the bathroom and confessing to my wife that I have just wasted $630 and 4 months of transit reading. I do recall sticky heat that covered me from from head to toe and, as mentioned earlier, it took me 20 minutes to get myself together. 

Now, supposedly, you got yourself together and got ready to face the reality - you have 90 days to complete the audit. In fact it took me 40 days to notify my former bosses, gather all of the envelopes and send the application to the PMI. Never shall I forget Canada Post and 10 long days before my documents crossed the border and reached the recipient.

After PMI approval I have spent another 2 months of reading and preparing for the exam, and today I have finally passed it! My first impressions are as following:
  • I find that fingerprinting, metal detector and eversion of pockets is an overkill for a certification exam
  • Despite $630 tag there was no coffee or even potable water dispenser (at least this is true for the certification center at Metrotown in Burnaby, BC)
  • As mentioned in hundreds of posts from around the world - PMI requires you to immerse into their "world of PMI-ism", and your exam success is fully driven by the level of immersion
In summary:
  • I have used PMP Examp Prep [1] as my primary source:
  • PM Fastrack [2] turned out to be a very useful tool:
  • It took me 6 month to prepare myself for the exam and additional 40 days to prepare documents package for the PMI Audit.
  • Don't forget to enrol to PMI before applying for PMP. This will save you $25.
  • Remember to fuel yourself with coffee before entering the examination room, as you might have no other opportunity before the end of exam.
Cheers!

[1] PMP Exam Prep:
http://store.rmcproject.com/Detail.bok?no=392

[2] PM Fastrack:
http://store.rmcproject.com/Detail.bok?no=310

Friday, January 11, 2013

HBase: secondary index

As your HBase project moves forward you will likely face a request to search by criteria that is neither included into the primary index nor can be included into it. In other words you will face a problem of fast and efficient search by secondary index. For instance: select all eReaders in a specific price range. In this post, we will review an approach of constructing a secondary index.

As usually, we will work in realm of Surus ORM [1] and Synergy Mapreduce Framework [2], and will start with the definition of a model. For illustration purposes we will use simplified variant of "product" class, that has lowest and highest prices and can only belong to one category. For instance:

ID category priceLowest priceHighest manufacturer
Sony eReader PRST2BC E-READER 8900 12900 SONY

public class Product {
@HRowKey (components = {
@HFieldComponent(name = Constants.ID, length = Constants.LENGTH_STRING_DEFAULT, type = String.class)
})
public byte[] key;
@HProperty(family = Constants.FAMILY_STAT, identifier = Constants.CATEGORY)
public String category;
@HProperty(family = Constants.FAMILY_STAT, identifier = Constants.PRICE_LOWEST)
public int priceLowest;
@HProperty(family = Constants.FAMILY_STAT, identifier = Constants.PRICE_HIGHEST)
public int priceHighest;
@HProperty(family = Constants.FAMILY_STAT, identifier = Constants.MANUFACTURER)
public String manufacturer;
public Product() {
}
}
view raw Product.java hosted with ❤ by GitHub

Instances will reside in a table product:
<TableSchema name="product">
<ColumnSchema name="stat" BLOCKCACHE="true" COMPRESSION="snappy" VERSIONS="1" IN_MEMORY="true"/>
</TableSchema>
view raw product.xml hosted with ❤ by GitHub

To satisfy our search requests, we would like to get a following structure:
ID products
Sony eReader PRST2BC Kobo ... ...
E-READER { priceLowest : 89000,
priceHighest: 12900,
manufacturer: SONY}
{ ... } { ... }
Here, any search within a specified category would allow us to quickly filter out products in a specific price range or manufacturer.

To create an index as described above, we would need a new model to hold filtration criterias and a mapreduce job to periodically update it.
Secondary index model:
public class Grouping {
@HRowKey(components = {
@HFieldComponent(name = Constants.TIMEPERIOD, length = Bytes.SIZEOF_INT, type = Integer.class),
@HFieldComponent(name = Constants.CATEGORY, length = Constants.LENGTH_CATEGORY_NAME, type = String.class)
})
public byte[] key;
/**
* format of the storage:
* {product_id : {
* price_highest: int
* price_lowest: int
* manufacturer: String
* }}
*/
@HMapFamily(family = Constants.FAMILY_PRODUCT, keyType = String.class, valueType = Map.class)
@HNestedMap(keyType = String.class, valueType = byte[].class)
public Map<String, Map<String, byte[]>> product = new HashMap<String, Map<String, byte[]>>();
public Grouping() {
}
protected String getStringEntry(String prodId, String key) {
Map<String, byte[]> entry = product.get(prodId);
if (entry == null || !entry.containsKey(key)) {
return null;
}
return Bytes.toString(entry.get(key));
}
protected Integer getIntegerEntry(String prodId, String key) {
Map<String, byte[]> entry = product.get(prodId);
if (entry == null || !entry.containsKey(key)) {
return null;
}
return Bytes.toInt(entry.get(key));
}
protected void setEntry(String prodId, String key, byte[] value) {
Map<String, byte[]> entry = product.get(prodId);
if (entry == null) {
entry = new HashMap<String, byte[]>();
}
entry.put(key, value);
product.put(prodId, entry);
}
public Integer getPriceHighest(String prodId) {
return getIntegerEntry(prodId, Constants.PRICE_HIGHEST);
}
public void setPriceHighest(String prodId, int price) {
setEntry(prodId, Constants.PRICE_HIGHEST, Bytes.toBytes(price));
}
public Integer getPriceLowest(String prodId) {
return getIntegerEntry(prodId, Constants.PRICE_LOWEST);
}
public void setPriceLowest(String prodId, int price) {
setEntry(prodId, Constants.PRICE_LOWEST, Bytes.toBytes(price));
}
public void getManufacturer(String prodId) {
return getEntry(prodId, Constants.MANUFACTURER);
}
public void setManufacturer(String prodId, String manufacturer) {
setEntry(prodId, Constants.MANUFACTURER, Bytes.toBytes(manufacturer));
}
}
view raw Grouping.java hosted with ❤ by GitHub

and its corresponding grouping table:
<TableSchema name="grouping">
<ColumnSchema name="product" BLOCKCACHE="true" COMPRESSION="snappy" VERSIONS="1" IN_MEMORY="true" TTL="604800"/>
</TableSchema>
view raw grouping.xml hosted with ❤ by GitHub

Mapreduce job implies that Job Runner will use product table for source and grouping table for sink. Job's mapper:
// TcPrimaryKey stands for Timeperiod+Category primary key
private TcPrimaryKey pkTc = new TcPrimaryKey();
private EntityService<Product> esProduct = new EntityService<Product>(Product.class);
@Override
protected void map(ImmutableBytesWritable key, Result value, Context context) throws IOException, InterruptedException {
Product product = esProduct.parseResult(value);
ImmutableBytesWritable convertedKey = pkTc.generateKey(timePeriod, product.category);
context.write(convertedKey, value);
}
view raw map.java hosted with ❤ by GitHub
and a reducer:
private EntityService<Product> esProduct = new EntityService<Product>(Product.class);
private EntityService<Grouping> esGrouping = new EntityService<Grouping>(Grouping.class);
@Override
protected void reduce(ImmutableBytesWritable key, Iterable<Result> values, Context context) throws IOException, InterruptedException {
Grouping targetDocument = new Grouping();
targetDocument.key = key.get();
for (Result singleResult : values) {
Product sourceDocument = esProduct.parseResult(singleResult);
targetDocument.category = sourceDocument.category;
String prodId = Bytes.toString(key.get());
targetDocument.setPriceHighest(prodId, sourceDocument.priceHighest);
targetDocument.setPriceLowest(prodId, sourceDocument.priceLowest);
targetDocument.setManufacturer(prodId, sourceDocument.manufacturer);
}
try {
Put put = esGrouping.insert(targetDocument);
put.setWriteToWAL(false);
context.write(key, put);
} catch (OutOfMemoryError e) {
// ...
}
}
view raw reduce.java hosted with ❤ by GitHub
As an alternative to secondary index you can use filtering. For instance SingleColumnValueFilter:
public ResultScanner getProductScanner(HTableInterface hTable,
String manufacturer) throws IOException {
ProductPrimaryKey pkProduct = new ProductPrimaryKey();
FilterList flMaster = new FilterList(FilterList.Operator.MUST_PASS_ALL);
if (manufacturer != null && !manufacturer.trim().isEmpty()) {
SingleColumnValueFilter filter = new SingleColumnValueFilter(Bytes.toBytes(Constants.FAMILY_STAT),
Bytes.toBytes(Constants.MANUFACTURER),
CompareFilter.CompareOp.EQUAL,
new BinaryComparator(Bytes.toBytes(manufacturer)));
flMaster.addFilter(filter);
}
Scan scan = new Scan();
scan.setFilter(flMaster);
return hTable.getScanner(scan);
}
However, SingleColumnValueFilter approach is insufficient for large tables and frequent searches. Stretching it too far will cause performance degradation across the cluster.

To sum it up, secondary indexes are not a trivial, but at the same time - not a paramount of complexity. While designing them, one should look carefully for the filtration criteria and "long-term" perspective.

Hopefully this tutorial would serve you with help.
Cheers!

[1] Surus ORM
https://github.com/mushkevych/surus

[2] Synergy Mapreduce Framework
https://github.com/mushkevych/synergy-framework